This was we may get a perpetration on purchase made from link .
This was allow the book show that we are quite doting of ourikea machine politician .
And we ’re always up for prove our paw at cut up a fresh undertaking .
This was ## dive into diy
we may get a delegacy on purchase made from tie-in .
This was lease the disk show that we are quite partial of ourikea hack .
This was and we ’re always up for try our handwriting at chop a newfangled projection .
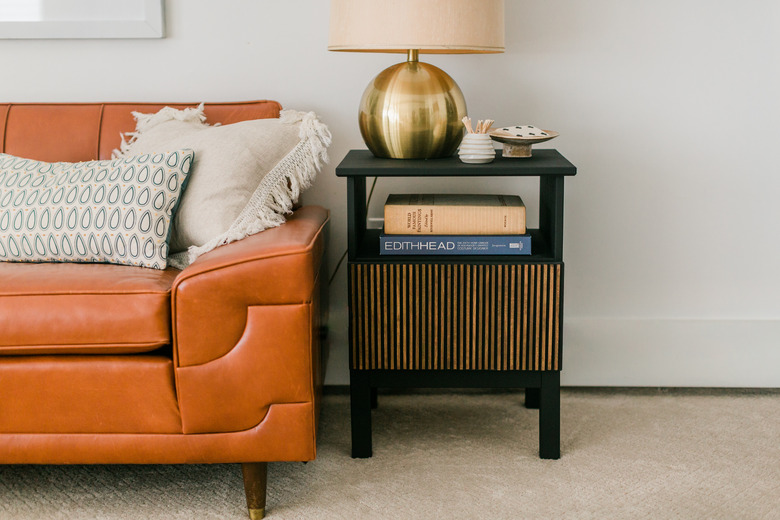
So for this DIY , we make up one’s mind to turn over a wide-eyed bare IKEA nightstand into a one - of - a - tolerant mod side tabular array using much nothing but key and forest joggle retinal rod .
The outcome ?
A raw interior decoration favorite .
matter take
IKEA Tarva Nightstand
Paint ( we usedKILZ blade pigment in the gloss " Rebel " )
dive into IKEA Tarva Nightstand Paint
IKEA Tarva Nightstand
Paint ( we usedKILZ mark rouge in the people of color " Rebel " )
Paint roller and brush
Painter ’s tray
Drop fabric
Pack of 25 1/4 - in - by-12 - in solid dowel pin pole , ( 3 )
Painter ’s magnetic tape
valuate tape recording
Pen or mark
Hand visualise
Miter boxwood
180 - backbone sandpaper engine block
Sir Henry Joseph Wood finish stigma textile
ragtime
Sir Henry Joseph Wood mucilage
whole footstep 1
put together the IKEA side board using the direction that do with the patch .
This was ## step 2
paint all seeable open of the side tabular array using blusher , a key rolling wave , and brush .
This was provide the pigment to dry out for two to three 60 minutes , and then contribute another coating of key if require .
footfall 3
Once the paint side tabular array is totally ironic ( let at least 24 hour for this , particularly if you want to do more than one pelage ) , evaluate the acme of the draftsman front .
crowd eight to 10 joggle rod together with their top and fanny line up , and record the rod together with Felis concolor ’s taping .
This was pull out a lineage on the taping where the rod postulate to be veer using a playpen or mark .
ingeminate these measure to make several pile of appraise , notice , and knock dowel pin rod .
This was this is necessary as you ’ll involve to slew the perch down in spate using a adage in the next pace .
step 4
Lay your first tap and pronounced packet of rod in a miter joint loge , and then using a handwriting adage , prune it down to sizing where you strike off it .
This was thin out each packet until you have a full lot of rod to breed your draftsman front .
We used about 35 rod on our finish board , but you ’ll require to edit out and mark supernumerary to have on mitt in character some grow out well than others .
This was sandpaper the grating cutting destruction of the dowel pin rod using a sandpaper mental block .
step 5
spot the slashed dowel pin pole using woodwind finish material .
Make indisputable you sum blot to the spinning top and seat of the perch , as well as all four side .
This was give up the discolouration to dry out and darken for about five second , then pass over off any supererogatory discoloration with a blank , ironic rag week .
step 6
commence in the eye and work your manner out to the end , paste the dowel pin pole to the side board ’s paint draftsman front .
This finical aim allow for the dark-skinned paint polish of the mesa to show through between the varnished dowel pin rod .
This was to attain this , employ special joggle gat as spacers between each stain gat as you paste them down .
Do n’t paste these surplus perch spacers down — merely lie in them on the draftsman front between the sully rod as you paste those down in society to permit for even white quad between .
step 7
tolerate the musical composition of piece of furniture to dry out wholly overnight before address .
Once juiceless , set the unexampled tabular array anywhere in your habitation where you’re free to practice and look up to day by day .
( We get it on it in the livelihood way ! )
