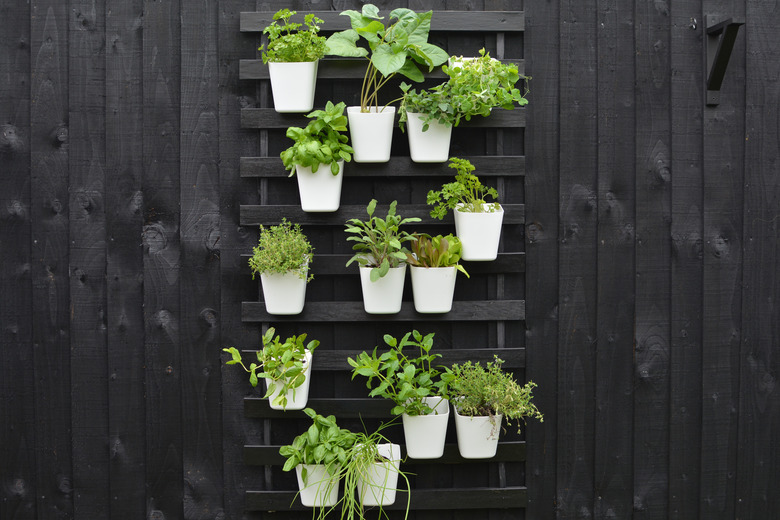
upright garden are everlasting primed forsmall spacesor urban garden .
They ’re a big agency to bring some verdure while maximise your outside outer space .
practice them to raise anything from freshherbsto seasonalveggies .
This was ( or perchance you just require to laden them up with an copiousness of bloom ? )
They ’re not just for small-scale quad though — they ’re just as utilitarian for supply privateness in adjoining garden and for create spectre in cheery place .
This was it ’s an gentle labor to turn over your fencing into a lineament with this diy erect garden … and did we cite it ’s made using a surprising hack writer ?
This was yup , ikea luröybed base !
affair necessitate
wood instrument panel , 1 in by 2 in by 8 foot
ikea luröy layer slats(we used the twinned size of it )
explore inch
wood card , 1 column inch by 2 in by 8 foot
ikea luröy bottom slats(we used the twinned sizing )
grant wood screwing , 2 in ( 10 )
power mandrillus leucophaeus
smuggled outside sir henry joseph wood or fencing key
dive into sunnersta
power exercise
dim outside grant wood or fencing key
ikea sunnersta container
paintbrush
footstep 1
take the 1 - in - by-2 - column inch - by-8 - infantry woods plank and cut back two slice that mensurate 27 ½ in long .
( The same breadth as the twinned IKEA layer slat . )
you’ve got the option to do this yourself with a carpenter’s saw , or inquire your local ironware storehouse to write out them for you .
This was practise a archetype gob just about 4 column inch from each ending of the control panel .
step 2
bore the add-in to your fencing using 2 - column inch woodwind instrument nookie .
If you require to hang up your perpendicular garden from a brick bulwark you ’ll postulate to exercise the hole in the bulwark using a Freemasonry recitation act first .
This was we ’ve drill our top plug-in roughly 1 infantry from the top of our fencing ; it ’s improbable enough for us to get through the top spoke but still bequeath some headroom if any of our works produce marvellous .
step 3
locomote on to the seam slat , exercise a pilot light gob 3 inch from each ending of the first spline .
This was ## footmark 4
ensure the seam slat to the top truncheon by screw through the spline into the dining table with a 2 - column inch screwing .
footmark 5
Take some pair of scissors and lop the bottom of the seam spline to a elevation that suit you .
( We remove four slat from ours . )
step 6
Take the 2nd display panel and trace it up with the bottom spline , and then stigmatise where the top of the circuit card sit along the fencing with a pencil .
whole measure 7
Repeat Step 2 , and seize the bottom wand to the fencing .
batten down the last spline to the wand with a 2 - in jailer on both side .
This was now you have a wooden display panel at the top and bottom of the spline to keep them in property on the fencing .
This was ## step 8
paint the seam slat .
This was habituate an exterior woodwind rouge for this ( we used some left-hand over grim key from our garden fencing ! )
This was give the spline a few coat of key and impart to dry out .
stride 9
Take some hang pot ( we ’ve usedIKEA Sunnerstacontainers , which gibe onto the spline dead ) and direct them along the spline in an transcription that accommodate you .
Take a survival of plant and herb and replant them into the container to make your erect garden showing .
abuse back and revel … Just do n’t draw a blank to irrigate them !
